How to knit: underarms:
It’s no secret amongst my knitting friends that I love knitting sleeves, seriously LOVE them. Apparently, this is a fairly unpopular perspective and I’m constantly surprised to hear so many knitters say they hate knitting sleeves!
Sleeves are seriously awesome to knit, they’re quick and mindless. If you knit them on small circumference circulars, as I do, it’s just a case of knitting around and around and around, and they grow so fast. Particularly in comparison to the body of a garment. The feeling of having slogged away at the body of a garment for what feels like forever, and then finally you come to the sleeves, and it seems like the end is in sight; that is such a great feeling! Tuck your knitting under your arm and you can knock off those sleeves anywhere.
However, I do get that some people don’t like knitting sleeves, they find the whole process of picking up stitches along the armholes a bit daunting. The feel taunted by those holes that occur and seem to see them as a failing of their knitting skills. They’re not. They are a reality for most seamless knitters, but they don’t have to be.
I believe it is possible to pick up stitches along the armhole and not have holes. And not have to darn.
I wrote a blog post about this whole process for the Gidday Baby KAL earlier this year, but if you didn’t join us for that KAL you may not have read it, so I’m going to go over it again here as it’s one of the most common complaints I hear about seamless knitting. Those bloody underarm holes.
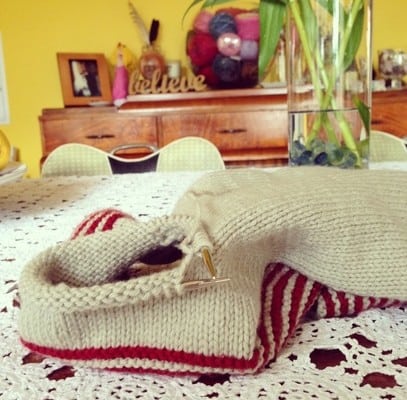
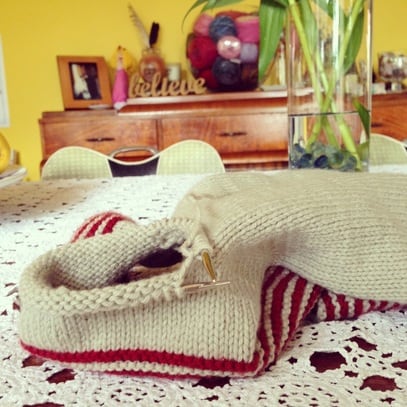
Using my technique your underarm will look like the one pictured at top. That’s before any ends are weaved in. Excellent hey!
There are some subtle differences that I like to work on my sleeves to help set them up for perfect underarms. The main one being that on the separation row for the sleeves and the body, I work a kfab either side of those sleeves stitches that are slipped to waste yarn. If you’re working a raglan, this just means you continue the raglan shaping right down into the separation row, if you’re working a circular yoke, you just add those kfabs in there as if you were working a raglan.
PICKING UP THOSE PESKY UNDERARM STITCHES
When it comes to picking up the underarm stitches, remember, there is nothing to fear. In fact, if you get it wrong the first time, it’s super simple to pull them out and have another go.
My approach to picking up underarm stitches does differ from some designers. I think the underarm pickup should be the complete process, I don’t believe you should have to darn holes under the arm as part of the finishing process. That to me, is not great workmanship and no matter how neat you darn it always looks a bit, well, not so neat. Part of the problem, I believe is that patterns generally don’t direct you to pick up enough stitches. Usually it’s the same number as you’ve cast on under the arm, but that is not enough to close any gaps. Depending on whether I’m knitting a raglan or a circular yoke I might pick up anywhere between three and five stitches more than I cast on under the arm. This helps to close up any gaps and eliminate any unsightly holes. You can apply this approach to any pattern.
Need a little refresher on picking up stitches?
Here’s a great link for picking up along a cast on/off edge:
http://www.knittingdaily.com/blogs/howto/archive/2009/02/10/picking-up-stitches.aspx
WHERE TO START
If you look at the photo above the big red arrow points to little bump left by the kfab stitch. The V which this arrow also points to is where you will pick up your second stitch from. Picking up the first stitch from this spot on a circular yoke can leave a bit of a gap. We don’t want that. See the stitch I’ve marked with the pink stitch marker. Around there is where you want to pick up your first stitch. Note the stitch I’ve chosen to go in through is one with a small hole. Always chose the smaller hole option, picking up through a bigger hole won’t close it up; it will emphasis it. We don’t want that.
When you’re picking up stitches, make sure you pick up through the V of each stitch around the underarm, picking up through two strands of yarn. The yarn on your needle should look like this when you’re picking up.
Generally, when you’re picking up these stitches if you pick up around to the stitch marked by the kfab you’ll have the correct number. You’ll recognise this stitch as it’s the last obvious one to pick up. If you look closely it looks a bit different, a bit tighter and you can see the bump caused by the kfab.
Sometimes though, this will leave you one stitch short of the required number to pick up. This will be the case for the 15″ size, you still have to pick up one more stitch. You can pick up this stitch anywhere in the gap between the last picked up stitch and the needle, remembering to choose a smaller space to pick up through. What I do sometimes, however, is a little unconventional, but it works.
Imagine I’ve picked up around all the underarm stitches, (you need to imagine it, because unfortunately this photo below doesn’t show those picked up stitches). There is still one stitch to be picked up. I’ve marked the stitch I pick up with a stitch marker. Note that I’ve marked the right leg of the stitch and it is the stitch next to the one on the needle.
I slip this right leg back onto the left needle and knit it. Unconventional? Yes. Effective? Yes!
source: http://www.knittingdaily.com/blogs/knitting-daily/tutorials-picking-up-stitches-properly/
See also
You also may like:
Aran pullover with pockets and hood-free knitting pattern


