
Summer tank top for women-free knitting pattern
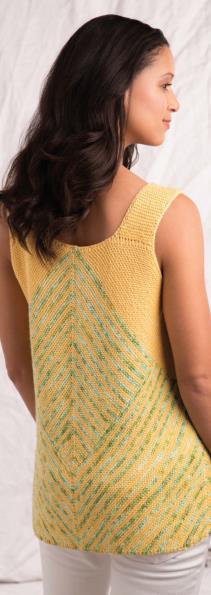
Diagonal stripes create a slimming effect and distinctive design on this garter stitch tank that is suitable
for dressing up or down.
Summer tank top for women-free knitted pattern
Sizes
Woman’s small (medium, large, X-large, 2X-large) with 2 inches of ease Instructions are given for smallest size,
with larger sizes in parentheses. When only 1 number is given, it applies to all sizes.
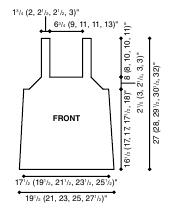
Finished Measurements
Chest: 35 (39, 43, 47, 51) inches
Length: 23 (24, 24½, 25½, 26½) inches
Materials
• Lorna’s Laces Solemate
(fingering weight; 55% superwash merino wool/ 30% Outlast viscose/15% nylon;
425 yds/100g per hank): 2 (2, 2, 2, 3) hanks sunshine #40NS (MC) and 1 (1, 1, 2, 2) hank(s) Prague #1316 (CC)
• Size 2½ (3mm) 24-inch circular needle or size needed to obtain gauge
• Size C/2 (2.75mm) crochet hook
• Locking stitch markers
Gauge
25 sts and 48 rows = 4 inches/10cm in garter st.
To save time, take time to check gauge
Pattern Notes
The back and front are worked separately. Stitches for the straps are picked up on the upper front edge and
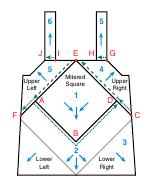
sewn to the upper back edgeThe front and back of the tank are worked the same, modularly. The
garment begins with a mitered square at the center-top of the tank. New sections are added by picking up
stitches along a selvage edge or by provisionally casting on new stitches. Refer to diagram for order of knitting
and location of picked-up and cast- on stitches. “Right” and “left” refer to edges of fabric as it faces you with upper
portion of garment at top (as shown in diagram), not the right and left sides as worn.
Center and lower sections are worked in 4-row (2-ridge) garter stripes. Carry yarn not in use up side edge. To make a tidy edge, twist the 2 yarns before starting the 3rd row (2nd ridge) of a stripe.The written instructions include
references to points, which are denoted by capital letters A to J on the diagram. Arrows indicate the direction of knitting.
Tank
Front
Center Mitered Square Make 2 crochet chains, each at least 65 (67, 70, 76, 80) sts long.
Row 1 (RS): Using CC as a continuous strand, provisionally cast on 62 (64,
67, 73, 76) sts in 1 chain and 61 (63, 66, 72, 75) sts in 2nd chain—123 (127, 133, 145, 151) sts.
With RS facing, pm in last st of first chain to mark center st. Note: Move center marker up 1 ridge after every RS row;
RS row until 5 sts rem, ending on a WS row. Last 3 rows: Make point as for Mitered Square. Lower Right Corner
Transfer Lower Right sts from holder to needle.
With RS facing, rejoin yarn (in established color sequence).
Sizes Large (X-Large, 2X-Large) Only Work 11 (13, 22) ridges, making 1 dec at beg of every RS row as follows: K1, k2tog, knit to end of row—77 (81, 75) sts. With RS facing, pm at end of previous ridge for point C (see diagram).
All Sizes Work 35, (40, 36, 38, 35) more ridges, making 1 dec at beg and end of every RS row until 5 sts rem, ending on a WS row. Last 3 rows: Make point as for Mitered Square.
Upper Right
With RS facing, unzip crochet chain between points E and D and transfer 61 (63, 66, 72, 75) sts to non-
working needle. With RS facing, using MC and beg at marked point C on diagram, pick up
and knit 10 (20, 28, 31, 36) sts between C and D, then knit across sts that were
transferred to non-working needle— 71 (83, 94, 103, 111) sts.
Next row (WS): Knit. Work 23 (26, 34, 34, 38) ridges garter st and dec 1 at beg and end of every there should always be an equal number of sts on either side of the marked center st.
Row 2 and all WS rows: Knit.
Row 3 (RS): Knit to 1 st before center st, sk2p, knit to end of row—121 (125, 131, 143, 149) sts.
Row 4: Rep Row 2.
Rep [Rows 3 and 4] 58 (60, 63, 69, 72) times, making color changes every 4 rows (2 ridges) at beg of RS row.
Carry alternate color along selvage and do not cut—5 sts.
Make point as follows:
Row 1 (RS): K1, sk2p, k1—3 sts.
Row 2 (WS): Knit.
Row 3: Sk2p—1 st.
Cut and tie off.
Lower Left & Right Sections
With RS facing, using CC and beg at A on diagram, pick up and knit 63 (65, 68, 74, 77) sts along edge between A and B (approx 1 st in each ridge) for left section, 1 st at the tie-off point for mitered square
(B) and 63 (65, 68, 74, 77) sts along edge between B and D for right section— 127 (131, 137, 149, 155) sts. Pm in st 64 (66, 69, 75, 78) to mark center st. Note: Move marker up 1 ridge to new center st after working
each RS row.
Next row (WS): Knit, adjusting st count as necessary and ensuring that there are the same number of sts on either
side of the center st.
Row 1 (Inc, RS): Knit to marked center st, pfbf, knit to end—129 (133, 139, 151, 157) sts.
Row 2 and all WS rows: Knit.
Rep [Rows 1 and 2] 11 (19, 19, 19, 19) times, working alternating 4-row stripes in CC and MC, changing colors
every other RS row—151 (171, 177, 189, 195) sts.
Size Small Only
Pm at beg and end of previous row for points C and F (see diagram).
Work 11 more ridges (22 rows) and dec 1 st at beg and end of every RS row and continue to inc 2 sts at center as before, ending on a WS row—no st count change.
Size Medium Only
Pm at beg and end of previous row for points C and F (see diagram). All Sizes With RS facing, transfer last 76 (86,
89, 95, 98) sts on needle to holder for Lower Right Corner—75 (85, 88, 94, 97) sts.
Lower Left Corner
Sizes Large (X-Large, 2X-Large) Only Work 11 (13, 22) ridges, making 1 dec at end of every RS row as follows: Knit to last 3 sts, k2tog, k1—77 (81, 75) sts.
With RS facing, pm at beg of previous ridge for point F (see diagram).
All Sizes
Work 35 (40, 36, 38, 35) ridges, making 1 dec at beg and end of every RS row, ending on a RS row—25 (31, 26, 35, 35) sts.
Shape Armhole
Next row (WS): Bind off 16 (22, 17, 26, 26) sts, knit to end—9 sts.
Work 2 ridges garter st and dec 1 at beg and end of every RS row—5 sts.
Last 3 rows: Make point as for Mitered Square.
Upper Left
With RS facing, unzip crochet chain between points A and E and transfer 61 (63, 66, 72, 75) sts to
non-working needle. With RS facing, using MC and beg at E of mitered square; knit across sts just
transferred, then pick up and knit 10 (20, 28, 31, 36) sts along edge between A and F—71 (83, 94, 103, 111) sts.
Work 23 (26, 34, 34, 38) ridges garter st and dec 1 at beg and end of every RS row, ending on a WS row—25 (31, 26, 35, 35) sts.
Shape Armhole
Next row (RS): Bind off 16 (22, 17, 26, 26) sts, knit to end—9 sts.
Work 2 ridges garter st and dec 1 at beg and end edge of every RS row—5 sts.
Last 3 rows: Make point as for Mitered Square.
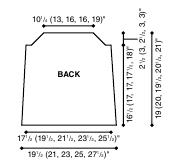
Back
Work same as Front.
Left Strap
With RS of Front facing, using MC and beg at G on diagram, pick up and knit 11 (12, 15, 15, 18) sts between G and H— approx 1¾ (2, 2½, 2½, 3) inches.
Work 40 (40, 50, 50, 55) ridges, ending on a WS row. Bind off, leaving a 12-inch tail.
Note: Crochet edge that is added during Finishing removes stretch from the strap. To evaluate if strap is correct length, add crochet edge at this point, attach strap to back of top temporarily and try on.
Right Strap
With RS of Front facing, using MC and beg at I on diagram, pick up and knit 11 (12, 15, 15, 18) sts between I and J of Front—1¾ (2, 2½, 2½, 3) inches. Work 40 (40, 50, 50, 55) ridges, ending on a WS row.
Bind off, leaving a 12-inch tail.
Finishing
Block Front and Back to measurements. Note: “Left” and “Right” now refer to garment as worn.
Use garter st seam for all seams Sew side seam, matching stripes. Sew end of right strap to back edge between I and J. Sew end of left strap to back edge between G and H.
Armhole Edging
With RS facing, using MC and crochet hook, and beg at bottom of strap on Back, *make 1 sc (see page 81) between
next 3 ridges, skip 1 ridge*; rep from * to *, ending at bottom of strap on Front;
skip 2 sts to make a corner, **make 1 sc in each bound-off underarm st**; rep from * to * to bound-off back underarm sts; rep from ** to ** to last 2 sts; skip last 2 sts to make corner. Slip st in first sc, then cut yarn and fasten off.
Rep for other armhole.
Neck Edging
With RS facing, using MC and crochet hook, and beg at center back, work sc edge as for armhole, working 3 sc for
every 4 ridges and skipping 2 sts at each corner.
Weave in all ends.
See also ADELE JACKET-knitting pattern-
women knitted jacket


