What are mitered squares?
What are mitered squares?
Mitered squares are a type of modular knitting that takes its inspiration from the world of woodworking. Mitering means “to bevel the ends of,” and a miter joint is created when the ends of two pieces of wood are
cut at an angle so that they meet to create a corner. Usually the corner is a 90-degree angle, which is created by two 45-degree angled cuts. Great examples are the frames of the windows and doors in your home.
In knitting, a mitered square is created when stitches are continuously decreased in the center of a row (the
miter “joint”), pulling in the sides of the fabric to form right angles. This is done by casting on the number of
stitches you need to create two sides of the square and working decreases in the center on designated rows. As the total number of stitches is decreased, the two sides of the square are pulled toward each other. By the time a couple of stitches remain, you will have created a right angle and formed the opposite corner of the square. It’s like magic!
Creating Mitered Squares
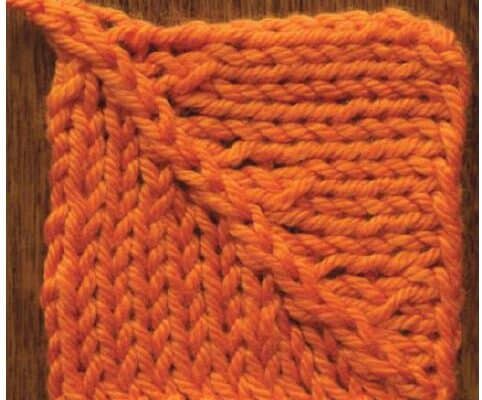
A mitered square is created by working decreases in the center of the row on designated rows. The decreases can be paired single decreases on either side of the center, or a centered double decrease.
The paired decreases are usually worked as an ssk with the two stitches just right of the center to create a left-leaning decrease, and a k2tog with the two stitches just left of center to create a right-leaning decrease. These decreases use a total of four stitches. You would cast on an even number of stitches if working decreases next to each other, or an odd number of stitches if working a center stitch in between the decreases.
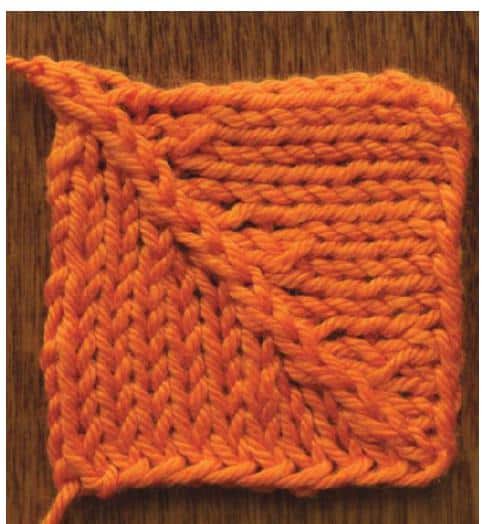
A centered double decrease (CDD: slip two stitches as if to knit two together, knit next stitch, pass the two slipped stitches over) is worked over a total of three stitches, so you would cast on an odd number of stitches to create these squares.
Garter stitch is worked in all knit stitches on every row and has a “square” gauge, which makes it an easy stitch
pattern to use for mitered squares. A “square” gauge means that the width of one stitch equals the height of two rows (in this case, one ridge).
Therefore, to create a mitered square in garter stitch, the decrease rows are worked every other row to create a square block.
Basic Mitered Square Directions
Garter Stitch With Paired Decreases Cast on 10 sts, pm, cast on 10 sts—20 sts.
Row 1: Knit.
Row 2 (RS, dec): Knit to 2 sts before
marker, ssk, slip marker, k2tog, knit to
end of row—2 sts dec.
Rep Rows 1 and 2 until 2 sts rem.
Bind oɇ.
Garter Stitch With Centered Double
Decreases
Cast on 21 sts.
Row 1: Knit.
Row 2 (RS, dec): K9, CDD, knit to end of
row—19 sts.
Row 3: Knit.
Row 4: K8, CDD, knit to end of row—17 sts.
Continue in this manner, alternating one row of all knit stitches with one decrease row, and working one stitch
fewer before the decrease on each subsequent decrease row, until one stitch remains.
Cut the yarn, then fasten oɇ.
Incorporating Stitch Patterns Into Mitered Squares
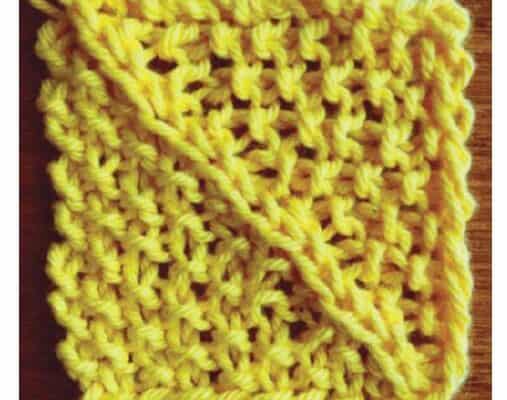
Now, what if you want to create a square in a pattern like seed stitch, which is created when single knits and purls alternate horizontally and vertically?
Since seed stitch is also a fairly “square pattern” (where 1 stitch = 2 rows), you can start with the Square 2 Garter Stitch pattern above. Then you will incorporate the decreases into the center of the stitch pattern. And to create a nice diagonal miter “join,” work the center stitch as a purl on each wrong-side row .
Seed Stitch Centered Square
Cast on 19 sts.
Row 1 (WS): [K1, p1] 4 times, p3, [k1, p1] 4 times.
Row 2: [P1, k1] 4 times, CDD, [p1, k1] 4 times—17 sts.
Row 3: [K1, p1] 4 times, p1, [k1, p1] 4 times.
Row 4: [P1, k1] 3 times, p1, CDD, k1, [p1, k1] 3 times—15 sts.
Row 5: [K1, p1] 4 times, p1, [k1, p1] 3 times.
Row 6: [P1, k1] 3 times, CDD, [p1, k1] 3 times—13 sts.
Row 7: [K1, p1] 3 times, p1, [k1, p1] 3 times.
Row 8: [P1, k1] 2 times, p1, CDD, k1, [p1, k1] 2 times—11 sts.
Row 9: [K1, p1] 3 times, p1, [k1, p1] 2 times.
Row 10: [P1, k1] 2 times, CDD, [p1, k1] 2 times—9 sts.
Row 11: [K1, p1] 2 times, p1, [k1, p1] 2 times.
Row 12: P1, k1, p1, CDD, k1, p1, k1—7 sts.
Row 13: K1, p1, k1, p2, k1, p1.
Row 14: P1, k1, CDD, p1, k1—5 sts.
Row 15: K1, p2, k1, p1.
Row 16: P1, CDD, k1—3 sts.
Row 17: K1, p2.
Row 18: CDD—1 st.
Cut the yarn and fasten off.
Most other “square” stitch patterns can be used to make a mitered square. If the ratio of stitches to rows is 1 stitch = 2 rows, then you can adjust the knits and purls within the pattern just as we did in the Seed Stitch square.
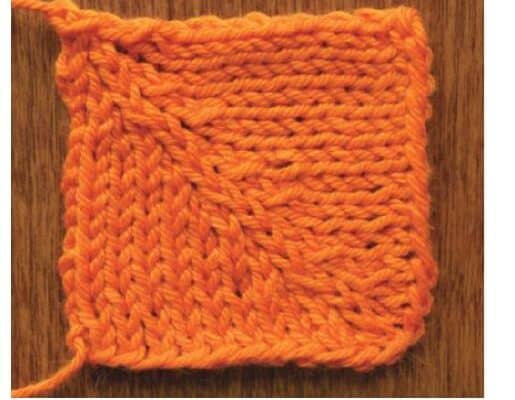
Mitered squares can also be worked in stockinette stitch by working a row of purl stitches on alternate rows and adjusting the number of decreases. Stockinette stitches are wider than they are tall, and a stockinette stitch pattern has more rows than stitches per inch. Therefore, in order to make a square block in stockinette
stitch, the ratio of decreases needs to be adjusted so that there are three stitches decreased every other row.
Stockinette Stitch Basic Square
Cast on 24 sts.
Row 1 and all WS rows: Purl.
Row 2: K9, ssk, [k2tog] twice, k9—21 sts.
Row 4: K8, [ssk] twice, k2tog, k7—18 sts.
Row 6: K6, ssk, [k2tog] twice, k6—15 sts.
Row 8: K5, [ssk] twice, k2tog, k4—12 sts.
Row 10: K3, ssk, [k2tog] twice, k3—9 sts.
Row 12: K2, [ssk] twice, k2tog, k1—6 sts.
Row 14: Ssk, [k2tog] twice—3 sts.
Row 16: Sk2p—1 st.
Cut the yarn and fasten off.
Stockinette Stitch With Centered Double Decreases
Cast on 21 sts.
Row 1 and all WS rows: Purl.
Row 2: K7, ssk, CDD, k9—18 sts.
Row 4: K7, CDD, k2tog, k6—15 sts.
Row 6: K4, ssk, CDD, k6—12 sts.
Row 8: K4, CDD, k2tog, k3—9 sts.
Row 10: K1, ssk, CDD, k3—6 sts.
Row 12: K1, CDD, k2tog—3 sts.
Row 14: CDD—1 st.
Cut the yarn and fasten off.
You may be wondering if stitch patterns such as lace can be adapted to create mitered squares—yes! As
above, you will need to identify if the background of the lace is worked in garter or stockinette stitch and apply
the correct decrease ratio accordingly. Additionally, you will need to incorporate the mitered decreases in the center of the stitch pattern while keeping the lace increases paired with the decreases to maintain the correct stitch count.

Mitered squares are a great way to use up leftover bits of yarn and can be a fun way to play with textured yarns.
Just keep in mind that you’ll need to use yarns of the same weight together in one square to maintain the same
stitch gauge.
Let your imagination go wild and enjoy playing with the magic of mitered squares!

Playing With Color & Texture
Mitered squares can be made in a variety of colorwork techniques to create extra pizzazz in your project.
Try playing with garter stripes! Color-block squares can be made by working multiple rows in one color,
switching to a second color for a few rows, and so on. Or try two di2erent colors on each half of one row. You can also use gradients and variegated yarns to stunning effect!
See how to knit a summer tank with mitered squares

useful information about how to knit Mitered squares