
Knitting for the perfect fit -Masterclass

ONE OF the great benefits of hand knitting is that you can achieve a fit that is exactly right for you. Knitted fabric has a fair bit of stretch in it, but even so, if you want a fitted garment to glide smoothly over your curves, the answer is likely to lie in bust darts, created using short rows.Here we look at adding darts to a design which doesn’t have them, adjusting those that do, and removing them altogether if they really aren’t for you.
Why add short rows for bust darts? Side increases from waist to armhole allow for the extra width needed in the upper body, but darts made by working short rows to increase the amount of fabric in the centre of the Front of a garment help to do this in a way which minim ises bulk. If the garment is designed to hang loosely then a
neat fit is not an issue, but if you find that knitw ear tends to gather or w rinkle under your arms, then darts would help.Put on a slim -fitting sweater w ith no shaping and look in the m irror to see if you like the fit around the bust line. Does it pull across the front or pucker under the arms? Try folding the excess fabric into a dart, and see if you prefer the look.
Why remove short rows?If darted knitw ear sags at the front – and not by design – then you would get a neater
look if you remove the darts.HOW TO ADD A DARTLet’s take a basic top in stocking stitch as an example. It has increases at the sides on the back and front but no bust darts. I ’ve loosely based it on my Penny top from Issue
43, using the third size and omitting the polka dot pattern or darts at this stage.Where do you want the dart?
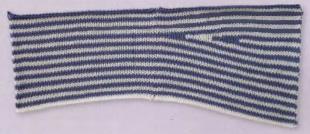
First we must decide on which row the dart should be constructed. The overall plan is to start on the row w hich falls at the fullest part of the bust, work a series of short rows in the centre and then finish that row.The stripey swatch in O shows how the dart is constructed. The short-row shaping makes the triangular shape, w ith the tip at the side seam allowing the Front and Back to match exactly. This means, of course, that it is also perfectly possible to work
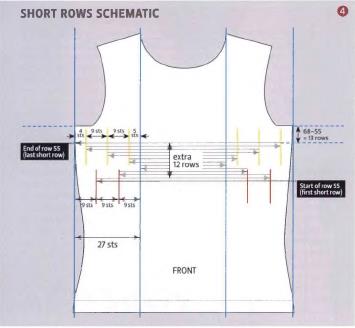
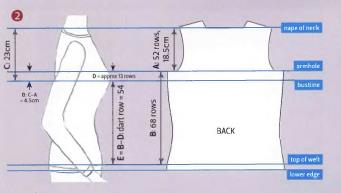
darts into garments knitted in the round.Here’s how to locate that row.A sketch helps (© ), especially if there is not
already a schematic. W rite on it the armhole depth (A) and number of rows from top of the welt to the underarm (B).
The measurement A might be on the blocking diagram but if not, add up the number of rows from the first armhole shaping to the start of shoulder shaping (almost always the same row as the nape of the neck) and use the tension to calculate the depth.In our example, the instructions from armhole to shoulder shaping are:Cast off 3 sts at beginning of next two rows. Decrease 1 st at both ends of next 2 rows. Dec 1 st at both ends of next 3 RS rows.
W ork for 43 rows without shaping, ending with RS facing for next row.(Then shape shoulders and back neck).
Total shaping rows = 2 (cast off rows) + 2 (decreases every row) + 5 (decrease on RS rows) = 9 rows. Add straight rows, grand total = 9 + 43 = 52 rows.Tension is 22 sts and 28 rows to 10 cm (which is 2.2 sts and 2.8 rows per cm), so armhole depth is 52/2.8 = 18.6 cm (to the nearest 0.5 cm).B: Calculate this from the pattern.In our example, the instructions are: Increase 1 st st at both ends of the 5th and 5 following 10th rows. Continue without further shaping for 13 rows.Total rows from welt to armhole = 5 (1st inc is on the 5th row) + 5 x 10 (5 increases every 10th row) + 13 (straight rows) = 68 rows.Measurements from you Next, find the position of your bust line. Place a tape measure around your body at the fullest part of your bust, then measure from the nape (the bony bit at the back of your neck) down to the center of the tape measure on your back – this is easier with a ruler if you are doing it yourself.
This gives measurement C and is usually approximately 4 to 5 cm below the start of armhole shaping in this type of top with close-fitting armholes.
Subtract A (armhole depth of pattern) from C (your nape to bust line measurement) to give D, which is the position of the dart below the armhole.To find the number of rows this represents, multiply by the tension.In our example:
D = C- A = 23- 18.5 = 4.5cm.Tension is 22 sts and 28 rows to 10cm (which is 2.2 sts and 2.8 rows per cm), so D
is 4.5 x 2.8 = 12.6 rows and so the dart should be placed about 13 rows before the start of armhole shaping.
Top of welt to armhole (B) = 68 rows.Dart to armhole (D) = approx 13 ro w s.B-D = 68 -13 = 55 and so dart should be on Row 55.If your pattern already has darts, these measurements w ill help you check that they occur in about the right place for you. If not, reposition them by starting at an earlier or later row, but remember to recalculate the number of rows required to finish up to the armhole to match the Back.At this point, check all the side shaping has
been completed by, or on, the row that you want to place your dart. If not, it is best to alter the rate of increasing so that it does. This ought to be the widest part of the Front, unless of course there is a particular design feature to take into account.How much should I add?Approximately 4cm to 5cm extra fabric is fairly standard. Experience w ill help you decide whether you prefer more or less.In our example with tension of 2.8 row/cm:4cm = 4 x 2.8 = 11.2 rows
5cm = 5 x 2.8 = 14 rows Since short rows are in pairs, check that the suggested number of additional rows is
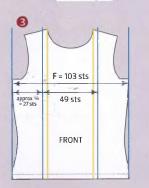
divisible by 2.Let’s choose a dart of about 4cm in this instance and round up the number of rows a little to 12 rows. The number is now exactly divisible by 2 and gives us 4.3cm extra fabric which is perfect for our example as it is meant to be close-fitting. How long?Normally the dart extends to slightly more than one quarter of the w id th of the Front. This brings the end of the dart to just short of what dressmakers call the bust point.Find out from the pattern how many stitches are at the widest part of the Front -this is letter F in 3
In our example:F (sts at widest part) = 103, one quarter =103 * 4 = 25.75 = 26 sts (rounded to the nearest st).
Making the dart calculations So far we have worked out that we want 12 additional rows and each dart w idth is
approximately 26 sts in total.Short rows are in pairs and so 12 divided by 2 = 6, giving us a total of 6 turning points
each side, 3 points to the midpoint of the darts and 3 above. This works for any even number of pairs. If we have an odd number of pairs, say if we had chosen 5cm instead of 4cm, we would have had 7 pairs of rows
(14 extra rows + 2) giving us 7 turning points, 3 below the midpoint, 1 at the midpoint and 3 above.Turning points
W e need to determine the position of the turning points so that they are fairly evenly distributed along the line of the dart.First half Divide the number of sts by the number of turning points. In our example:Number of sts = approximately 26, number of turning points = 3.Sts divided by turning points = 26 + 3 = 8.7 sts. If we adjust this to 27 it is exactly divisible by 3 and we have three turning points 9 sts apart (O)- In our example the pattern would read:
Short Row 1, Row 55 (beginning): K n it to last 9 sts, w rap and turn.SR 2: Pu rl to last 9 sts, w & t.
SR 3: K n it to last 18 sts (9 + 9), w&t.SR 4: Pu rl to last 18 sts, w &t.SR 5: K n it to last 27 sts (9 + 9 + 9), w &t.
SR 6: Pu rl to last 27 sts, w & t.Second half If the rem aining three turning points occur at exactly the same place as the first three the result w ill be quite a noticeable jump where both wrapped sts have to be worked together. Instead, I prefer to offset the second set of short rows so they turn at about the midpoints of the first set (shown
in Figure 4) which gives a much smoother dart. Don’t forget to w ork the wraps when you eventually knit or purl them.In our example the pattern would read:
SR7: K n it to last 22 sts (4+9+9), w & t.
SR 8: Pu rl to last 22 sts, w & t.
SR 9: K n it to last 13 sts (4+9), w &t.
SR 10: Pu rl to last 13 sts, w &t.
SR 11: K n it to last 4 sts, w &t.
SR 12: Pu rl to last 4 sts, w &t.
SR 13, Row 55 (end): Kn it to end.
You may have spotted 13 rows altogether.Row 55 is actually split into two short rows and the net effect is a part row at either end and 13 rows in the middle giving the 12 extra rows we calculated.Just for comparison, in the 5cm example (7 pairs of rows) there are 4 points to the m idpoint and three above, and so the first half would be spaced 27 + 4 = 7, 7, 7 and 6 sts apart, and the second half would be spaced to fall between them.Calculating rows to armhole Only 1 row (Row 55 in this case) is used for the dart, the extra rows do not affect the side seam and so in our example:
Rows to armhole = B = 68 rows
Rows before dart = E = 54 rows
Dart row (Row 55) = 1 row
Remaining rows to armhole = B – E – dart =
68 – 54 – 1 = 13 rows.
In our example the pattern would read: Starting w ith a purl row, w ork in st st for 13 rows without further shaping.
HOW TO REMOVE A DART
In a basic sweater like our example, simply ignore all the references to short-row shaping and just work one row. However, if there is a stitch pattern or front edging such as in a cardigan, some adjustments m ay be required, and w e’ll look at this in the next section.
MAKING IT WORK
What if the design is not a basic sweater? Two principle variations spring to mind: one is a garment w ith a front opening such as a cardigan, and the other is one with a pattern such as Penny.Front openings Taking a basic cardigan as an example, the extra rows we have added w ill increase the length of the front edge. If only a few cm
has been added, the neatest way is to leave the length of the Front Band as the pattern suggested and gently ease in the excess to fit. This gives a smooth front opening which doesn’t gape. To test if that w ill be possible, thread some yarn through the edge sts from a few cms above to a few below the dart and gently pull it up. If there is too much extra fabric to ease in successfully, you w ill need to increase the length of the Front Band.
There is a repeat pattern
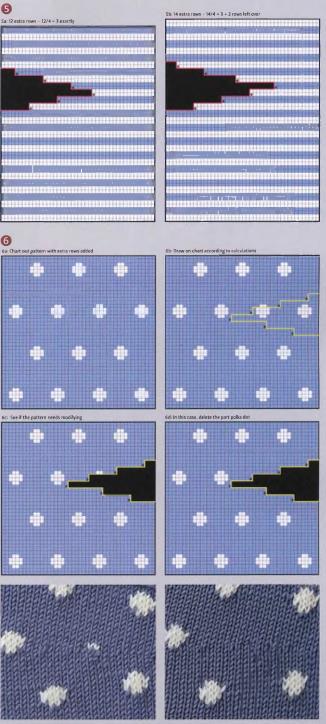
In a ll cases, make sure that the extra rows w ill not throw the pattern out for the rest of the Front if it has to match up with the sleeves for example, or at the sides where it must match the Back. This is true for lace, textured and color work patterns, but is most easily illustrated with colored stripes.Let’s take the striped swatch in Fig. 1 as
an example which has a four-row pattern repeat (2 blue, 2 white). If we compare the two swatches in © , shown here as charts, we can see that twelve rows being an exact multiple of the pattern repeat keeps it correct at the left hand edge – essential as this w ill eventually be seamed to the Back. But if we had added 14 rows (14+3 = 3
repeats and 2 rows left over), the pattern repeat at the side is out by two rows and so would not have matched the Back at the side seam (two blue rows would have come together). Also, the Front finishes with 2 white rows instead of blue, which w ill be a problem if it has to match stripes in the sleeve. The solution here is to work the dart
with either 12 or 16 rows depending on the size of dart you would prefer.
Since short-row shaping is in paired rows, a pattern with a two-row repeat is likely to work without too many problems. Any more than that w ill not necessarily look wrong but check by knitting a test swatch of short-row shaping. It is possible that the stitch pattern just won’t allow short-row shaping without spoiling the look of the
garment, especially if it is a very large repeat or one which varies the stitch number from row to row.
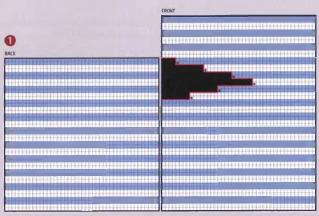
Adapting a pattern repeat Penny is an example of a large repeat, but here it is very simple to modify as there is
no obvious matching required at the side seam. However, the dart could w ell ‘cut through’ a polka dot, and this needs to be adjusted. The easiest w ay is chart out the extra rows and then modify the pattern, in this case, delete any polka dots which are incomplete. The absent ones are much less noticeable than the part-worked ones.
Considerations when removing a dart Stitch pattern repeats are unlikely to be a problem here, as the Front with the dart removed will mirror the Back up to the armhole. However, if it is a design with a front opening such as a cardigan be aware that you might need to make the Front Band shorter, if it is vertical, than the instructions suggest, or if you are to pick up sts, the number w ill be reduced. In both cases details such as buttonhole placements
or pattern repeats in the Front Band will have to be adjusted.
See also Entrelac: how to knit
Don’t miss new knitting pattern V-neck jumper for women


