Entarlac: How to knit: the basics of entrelac knitting step by step.
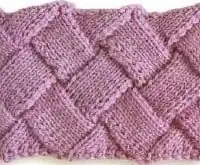
The architecture of entrelac is different from that of other types of knitting. Entrelac fabric is composed of tiers of blocks that are set on their points, forming diamond shapes. Each block is worked individually and joined to its neighbor as it is being knit.
Entrelac fabric can be created by knitting either flat or tubular shapes. In either method, you make the individual blocks one at a time by turning the work for each row of stitches. The basic process is outlined here.
In this example, you will learn how to create an entrelac swatch that consists o f five rows of stockinette-stitch
triangles an drectangles. This is the most basic entrelac pattern, an d it serves a s the starting point for all o f the entrelac patterns in this articl. Once y o u get the hang of it, you will be
ready to tackle the other patterns and the projects. To make it easier to distinguish between sections,
you can use two different colors of yarn as I have done here.
B A SE TRIANGLES
1. Using the method of your choice, cast on 24 stitches. You will be creating 3 Base Triangles, each 8 stitches wide. Race markers at every 8-stitch interval to help distinguish each triangle.
2 . To work the first Base Triangle, purl 2 sts on the wrong side of the work. Turn to the right side and k2. turn, p3. turn. k3. turn, p4. turn, k4, turn, p5 (shown here).
3 . Turn the work again and k5 on the right side (shown here). Continue in this way. working 1 more stitch every wrong-side row until 8 purl stitches have been worked. Do n o t turn. You are now ready to work a second triangle.
4 . W ork the second triangle as you did the first Do nof turn. You are now ready to start the third base triangle
5 . Work the third triangle as you did the first and second. Turn. You may think you have done something wrong, but this is how it should look -3 triangles that are attached to one another and curl up at the tips. The Base Triangles
are now complete.
RIGHT-HAND CORNER TRIANGLE
1 . You arc now ready to begin the Right- hand (RH) Corner Triangle. (I changed to a darker color yarn for clarity, but you can use the same color.) Knit 2 stitches (shown here) and turn. Purl 2 stitches and turn.
2 . On the right side, increase 1 stitch by knitting into the front and then the back (klfb) of the first stitch.
3 . Slip. slip, knit (ssk-see explanation below) with the dark stitch on right-hand needle and the light stitch on left-hand
needle of the Base Triangle to decrease I stitch (shown here). Turn, p 3 stitches, turn.
4 . K1 fb in the first stitch to increase, kl then work an ssk decrease at the end of the row-there are 4 stitches on the needle shown here. Turn, p 4 stitches* turn. Klfb. k2. ssk. turn. P5. turn Klfbi k3, ssk. turn. P6, turn. Klfb. k4.ssk. turn. P7, turn.
5 . On the next row. klfb, k5. ssk in the last stitch of the Base Triangle-8 stitches are on right-hand needle and a Owner
Triangle is made.
From “Enterlac. The Essential Guide to Interlace Knitting” Rosemary Drysdale
Download this lesson on PDF format:
[sociallocker] Download[/sociallocker]See also: free knitting patterns for men
Don’t miss new free knitting patterns for women
